Followers

Wednesday, 18 November 2015

Bedtime Mouse


Isn't this little mouse known as Bedtime Mouse over at Rick St Dennis MFA so adorable?
I just had to make a card with him. Look at those cuter than cute cat slippers he is wearing.
To make my card I started with a nay blue card base I then matted with yellow and then with a starry paper that I had in my stash I think from memory  may have got it from Big W. I then print my mouse out and coloured him with copic markers. I fussy cut him out and popped him up with double sided tape. To embellish I punched out a star and attached it to the card with twine. I added a wishes sentiment and a yellow gem to finish off.
The colours that I used are:
Y11,Y13,E50,E53,E55,C1,C2,C3,C4,R00,W0,W2,W3,YR23,YR27,B60,B63
To find this adorable mouse here is the link Bedtime Mouse
You may also want to look at some of the other wonderful inspiration on Sparkle and Glitter Blog

Monday, 16 November 2015

Lighting up Christmas


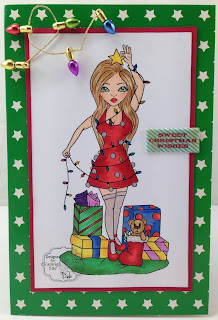
Christmas is fast approaching and today Im sharing the Christmas Spirit with the adorable digi Twinkle Twinkle by Karleigh Sue Designs.
To make my card I have started with a stary base card then I put a red matt down. I printed my digi out and coloured with mostly copic markers but I used glittery gel pens for the christmas lights so that they would sparkle. I then attached my image to the red matt. To finish off I added some mini christmas light decorations and a sticker sentiment.
The copic markers that I used are:
E000,E00,E01,R20,B60,B26,B23,R22,R24,R27,G3,C7,V05,V09,E35,E31,E33,Y17,Y13
To see some more awesome Karleigh Sue Inspiration here is the link Karleigh Sue Inspiration Blog

Sunday, 15 November 2015

Progressive Challenge November for Rick St Dennis MFA


Hi everyone, In Cairns Australia its really heating up so I thought Id share a summery creation with you for the Rick St Dennis progressive Challenge. Ive chosen to make a card using Helen's Mice July.
All the Rick St Dennis mice are awesome. 
To make my card I started with a chevron patterned base card because I thought it looked like water. I then matted in red. I printed my image out twice and coloured with copic markers. I fussy cut one of my images and popped it up with double sided tape. I then made a speech bubble and wrote the work hi in stickers. To finish off I added some gem droplets that I got from spotlight.
The colours that I used are:
C1,C2,C3,C4,Y13,Y17,R22,R24,R27,R00,B80,B24,B01,B21,B26
To find this awesome image here is the link Helens Mice July
To see all the other design teams projects for the progressive challenge here is the link

Saturday, 14 November 2015

colouring


Hi everyone I just wanted to share some recent colouring that I have done that Im proud of, saying that I still have room for improvement. The first one is by artist Bennett Klein and the other is by artist Narelle Craven.

Wednesday, 4 November 2015

Thanks a Latte


Hi everyone today I have some Autumn (Fall) inspiration for you with the lovely digi stamp called Pumpkin Spice Latte by Karleigh Sue designs. Quietly between me and you Im really happy with how my colouring turned out. To make my card I started with an orange base card then matted with red and a leafy patterned paper from Stampin Up. I then added some ribbon and an antique brad from Stampin Up. I made the sentiment myself using the computer. I printed out my pumpkin spice digi and coloured with copic markers I then cut her out and popped her up with double sided foam tape.
Here are the colours that I used:
E000,E00,E01,R20,YR21,YR23,YR27,R22,R24,R27,B06,B60,C7,W0
To find this gorgeous digi stamp here is the direct link Pumpkin Spice Latte
For loads more Karleigh Sue inspiration check out the Karleigh Sue Inspiration Blog